Adding a tail accent to your ring sling
Materials needed:
- Fabric:
- Depending on the kind of tail accent you want, you'll need...
- 12-18" by the width of your sling (usually about 30") for a lined tail accent
(good for any kind of fabric; requires sling fabric as long as your desired finished
measurement)
- 12-18" by the width of your sling for one that's just sewed to the end (good
for double-sided or thick fabric; requires sling fabric that's 12-18" shorter
than your desired finished measurement)
- 24-36" by the width of your sling for a double-layer one that's sewed to the end (good
for thin and single-sided fabric; requires sling fabric that's 12-18" shorter
than your desired finished measurement)
- Time: an extra 20 minutes or so.
Methods:
Topstitching:
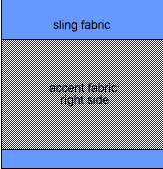 The easiest way to add a tail accent is just to cut the accent to the height you want, leaving the width a bit wider than your finished sling tail, and hem the top and bottom edges. Position the accent where you feel it looks best -- I usually have a piece that's about 12" tall, and sew it on so there's 2-3" of the sling fabric showing at the bottom. Then fold one of the side edges under by 1/2" or so, line it up with the edge of your sling, and topstitch along that fold. Turn and stitch along the bottom of the accent, folding the other side edge under when you get close to the edge. Turn and topstitch along that fold. When you get to the top of the accent, you can either sew all the way across, or make a U-shaped detour about a third of the way over, so that you have a built-in pocket.
Lined tail accent:
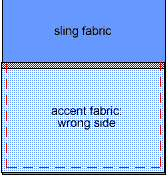 Without
hemming any of the edges or sewing in the rings, I put the fabrics right-side
together at the bottom of what will be the tail. I fold the accent piece
down about 1/2" at the top, then sew
about 3/4" from the edge around the accent piece's edge, across the bottom, and
up the other edge. then
I turn that right-side-out. That makes a fold for the edge hems on the
sling itself, so starting at the ring-end of the sling, I make my hem, and where
it meets the accent piece, I topstitch around, then hem the other side. Finally,
I go back and sew across the top of the accent piece -- that's why I do the 1/2" turn
when first sewing the accent to the tail.
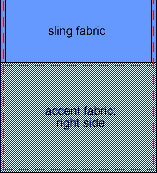 A lined tail is a great place to put a pocket -- using the first part of the patch
pocket directions (without cutting the fabric to a smaller size or hemming
the edges, that is), put the zipper in the accent fabric. Then sew the accent
fabric to the sling as shown above, and make the pocket by stitching a rectangle
through the accent and the sling fabrics. Voila! Yhe beauty of a tail accent
with the functionality of a pocket!
Single-layer hanging tail accent:
This is a lot easier, but it works best with fabrics that have a little weight
to them and are double-sided (e.g., not calicos or other printed fabrics).
Do a flat felled seam:


and then hem all edges, as you would a normal sling. Easy as pie!
This video shows how to make a French seam, then a felled seam; either one can be used to make a hanging tail accent.
Double-layer hanging tail accent:
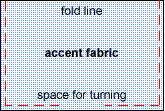 First,
hem the long edges of your sling fabric.
Find the center of the accent piece, fold it in half with right sides together (so it's 12-18" by
30"), then sew around the open edges, leaving a 10" space along the bottom for inserting the sling fabric and turning.
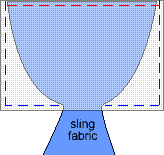 Then
stick the bottom corners of the sling fabric into each corner of the accent piece
(with its right sides still together). Pin carefully (making sure that the edge
of the sling fabric is lined up with the fold in the accent fabric), and stitch
across that about 1/2" from the edge. In the diagram at left, the
accent fabric is shown as translucent, so you can see that the edge of the sling
fabric is positioned along the accent's fold line, and the rest of the sling
fabric hangs through the space left for turning.
Then
pull the sling fabric out through the space, and that pulls the accent fabric
right-side out. Topstitch around
all those edges, also closing the space for turning.
All methods:
When you've added your accent piece, put in the rings as usual. If you've
used the lined accent method, make sure that when you sew the rings on, the accent
piece is on the "wrong" side of the sling, or else it won't show up when you
thread the sling!
All content, barring that which is otherwise attributed, is ©2023 to
Jan Andrea. If you wish to use my content on another page, please email before
doing so, even for content with the Creative Commons licenses. Text/images used
elsewhere must be attributed to me. Be advised that I will pursue copyright
violations.
 The easiest way to add a tail accent is just to cut the accent to the height you want, leaving the width a bit wider than your finished sling tail, and hem the top and bottom edges. Position the accent where you feel it looks best -- I usually have a piece that's about 12" tall, and sew it on so there's 2-3" of the sling fabric showing at the bottom. Then fold one of the side edges under by 1/2" or so, line it up with the edge of your sling, and topstitch along that fold. Turn and stitch along the bottom of the accent, folding the other side edge under when you get close to the edge. Turn and topstitch along that fold. When you get to the top of the accent, you can either sew all the way across, or make a U-shaped detour about a third of the way over, so that you have a built-in pocket.
  Without
hemming any of the edges or sewing in the rings, I put the fabrics right-side
together at the bottom of what will be the tail. I fold the accent piece
down about 1/2" at the top, then sew
about 3/4" from the edge around the accent piece's edge, across the bottom, and
up the other edge. then
I turn that right-side-out. That makes a fold for the edge hems on the
sling itself, so starting at the ring-end of the sling, I make my hem, and where
it meets the accent piece, I topstitch around, then hem the other side. Finally,
I go back and sew across the top of the accent piece -- that's why I do the 1/2" turn
when first sewing the accent to the tail.
  A lined tail is a great place to put a pocket -- using the first part of the

 First,
hem the long edges of your sling fabric.
  Then
stick the bottom corners of the sling fabric into each corner of the accent piece
(with its right sides still together). Pin carefully (making sure that the edge
of the sling fabric is lined up with the fold in the accent fabric), and stitch
across that about 1/2" from the edge. In the diagram at left, the
accent fabric is shown as translucent, so you can see that the edge of the sling
fabric is positioned along the accent's fold line, and the rest of the sling
fabric hangs through the space left for turning.