URL for this page is: http://crafts.sleepingbaby.net/dipecase.html
These directions are for personal use only. If you wish to sell a diapers
and wipes case, you may use these as a base pattern, but
please make significant changes to the finished product -- the flap is particuarly
ripe for design elements. Please click the "some rights reserved" button
to the upper left for more information. This pattern
is copyright to me (Jan Andrea) and is NOT for resale under ANY circumstances,
nor are diaper/wipes cases made from the design. I DO peruse Etsy and eBay from
time to time, and I know my pattern. Please make significant
changes to the design
if you are selling anything from it. If I wanted to have items sold
from this pattern, I would license it. I prefer to leave it free for *personal*
use, so I don't do licenses. Please respect the time and effort I have put into
the pattern, and *don't* sell it as your own.
 Update:
29 October 2007: Due to the number of unauthorized copies of the pattern
that are apparently floating around (that is, copies of the pattern printed from
my site with the copyright information stripped off), I have made changes to the pattern and these directions. Prior to this date, the pattern had an inwardly-curving
flap (as seen in the line drawing at left). That pattern is STILL under copyright.
If you receive a paper printout, PDF, or other form of the pattern with the copyrights
stripped, please be advised that it was an illegal copy and should not be used
to make diaper/wipes cases for sale without significant changes to the design
as above.
Update:
29 October 2007: Due to the number of unauthorized copies of the pattern
that are apparently floating around (that is, copies of the pattern printed from
my site with the copyright information stripped off), I have made changes to the pattern and these directions. Prior to this date, the pattern had an inwardly-curving
flap (as seen in the line drawing at left). That pattern is STILL under copyright.
If you receive a paper printout, PDF, or other form of the pattern with the copyrights
stripped, please be advised that it was an illegal copy and should not be used
to make diaper/wipes cases for sale without significant changes to the design
as above.
Fabric diaper case (
or diaper clutch)
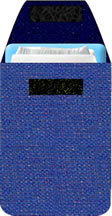 This
always seemed so self-evident to me that I never bothered putting up directions,
but since you can now buy one in "boutiques" for as much as $15... Here's all
you need to make your own. It's sized to fit a travel wipes container (you know,
those hard plastic ones that hold wet baby wipes) and a few disposable diapers;
if you increase the dimensions by a bit, you can put your cloth dipes (or a whole
lot more disposables) in it, too. (I would like to make it clear that I have
not seen one of the $15 ones in person, and this is my interpretation of a generalized
design. I have in no way copied the dimensions, styling, or other features of the one that is patent-pending, and had made fabric diaper-holding cases for
myself before that one came on the market.)
This
always seemed so self-evident to me that I never bothered putting up directions,
but since you can now buy one in "boutiques" for as much as $15... Here's all
you need to make your own. It's sized to fit a travel wipes container (you know,
those hard plastic ones that hold wet baby wipes) and a few disposable diapers;
if you increase the dimensions by a bit, you can put your cloth dipes (or a whole
lot more disposables) in it, too. (I would like to make it clear that I have
not seen one of the $15 ones in person, and this is my interpretation of a generalized
design. I have in no way copied the dimensions, styling, or other features of the one that is patent-pending, and had made fabric diaper-holding cases for
myself before that one came on the market.)
I would recommend measuring the wipes case you use most frequently before
sewing this. If it's wider or thicker than a standard case (I used the "Huggies"
hard plastic case when making the pattern), you'll need to enlarge the pattern
correspondingly. An extra inch is probably sufficient for most larger cases,
but do experiment before cutting your fabric. You can estimate how much wider
you'll need to make the case if you stack up your wipes case and the number of
diapers you plan to carry, then measure around the stack with a tape measure. The finished fabric diaper case as printed is 13" all the way around (measuring
around the girth, parallel to the "crafts.sleepingbaby.net" imprint on the one
in the picture above). If your stack is wider than that, you'll need to add some
width to your pieces. I would cut the piece in half vertically, splice in the
amount you'll need to add (keeping in mind that you need to add half that amount
to both the front and back pieces -- so if you need an extra 2" total, you'd
add an inch to the front and an inch to the back), and go from there.
Pattern and directions are copyright to Jan Andrea, sleeping
baby productions, and are not for resale or sale of items made from the pattern.
Materials needed:
- Fabrics: "Fat quarters" (pieces that are 18" by 22")
are sufficient for this project! You'll need one of a fashion fabric, and another
for lining (or you can use the same two; you'll need two pieces that are about
15" by 14").
- One 2.5-3" piece of hook and loop tape (like Velcro®)
- Pattern pieces: Front, Back
piece 1, Back
piece 2 (with flap) [Pieces are GIFs and will open in a new window. Back
pieces overlap and are taped together where marked -- whole piece is too large
for a single piece of paper.]
When printing the pieces, be sure the image is maximized in your browser first!
If you see a little magnifying glass with a + sign on it, click and that should
make the image the size it should be. Also doublecheck your printer settings
-- the pieces should be printed without being resized by your printer (to fit the paper or whatever).
- Matching thread
- Around a half-hour of your time, depending on your sewing knowledge
Directions:
Note: All seam allowances are 1/2 an inch.
Cut out the pattern pieces -- you'll have two front pieces (one of your
fashion fabric, one of lining) and two back pieces (one fashion fabric, one lining).
[Note: the pattern pieces for the back must be taped together where indicated
before cutting the fabric out!]
If you want to save paper, the front and lower
back piece are really the same, so you can cut your front part, then tape the
flap to it instead of cutting out the lower back as well. I have done that here,
so please don't be confused by the "front" on that piece; I just didn't want
to print three sheets when I could print two. |
 |
|
I like to just stack my two fabrics together, so I don't have to cut each
one separately. This works fine with thinner fabrics that stick together well; the ones I used here are brushed twill, so they really stuck together by themselves.
In the following directions, the turquoise is the outer (fashion) fabric and the red is the lining. Makes for a pretty eye-watering model, but hopefully it
will make the directions clearer.
At right, the two back pieces are cut out. |
 |
| Two front pieces cut out. |
 |
| Sew the loop side of the hook and loop tape to the front piece of fashion
fabric where indicated. If your fabric is a print, the loop tape should be
on the print side. |


|
| Sew the hook side of the hook and loop tape to the flap piece of lining where
indicated. If you are using a print for the lining, the hook tape should also
be on the print side. |


|
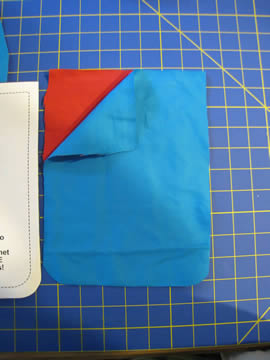
| Stack the two lining fabric pieces with their right sides together, matching
bottom and sides. Sew 1/2" from edges, slowing down where the fabric curves. |
 |
| Stack the two fashion fabric pieces with their right sides together, matching
bottom and sides. Sew 1/2" from edges, slowing down where the fabric curves. |
 |
Turn the fashion fabric pouch right side out. If you are using a print, it
will be on the outside now.
Do not turn the lining pouch right side out. It should stay inside-out. |
 |
| Pattern and directions are copyright to Jan Andrea,
sleeping baby productions, and are not for resale or sale of items made from the pattern. |
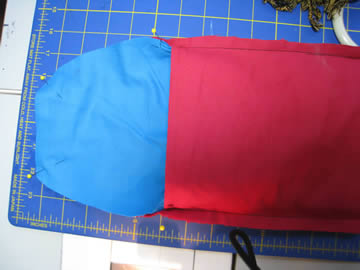
| Put the fashion fabric pouch inside the lining pouch. Their right sides should
be together (so if you're using prints, both of the wrong sides will be showing. |
 |
| Pin where necessary; I like to pin where the sides come together, and at the top of the flap. |
 |
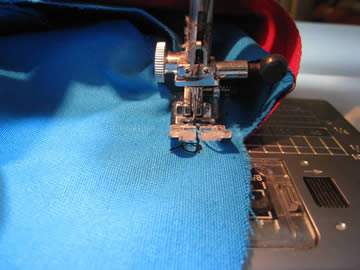
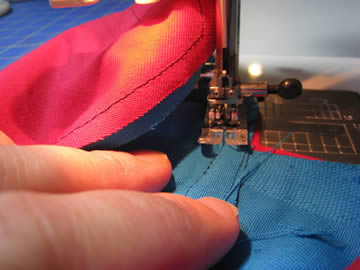
 Start
sewing the two together about an inch from the edges, again using a 1/2" seam
allowance. Backstitch a bit, since the gap you're leaving here will get some
stress when you turn the pouch right-side out. Start
sewing the two together about an inch from the edges, again using a 1/2" seam
allowance. Backstitch a bit, since the gap you're leaving here will get some
stress when you turn the pouch right-side out. |
 |
| Stop sewing with the needle down in the fabric, and pivot the fabric so that the flap is pointing towards you, when you get to the seam that joins the front
and back pieces. |
 |
| Sew along the flap, taking care with the curves. |
 |
| Pattern and directions are copyright to Jan Andrea,
sleeping baby productions, and are not for resale or sale of items made from the pattern. |
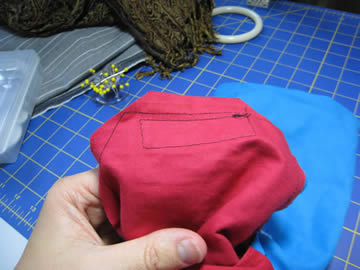
| In this photo, the flap has been sewn and I am at the opposite corner, where the flap meets the front of the pouch. As with the first pivot, stop when you've
reached the back/front seam and are about 1/2" down from the edge of the front
piece. Pivot and continue to sew another inch or so, leaving a gap for turning. |
 |
| the flap, sewn together; you can see the gap for turning between where the
stitching starts and ends. |
 |
| Clicp the corners of the flap, and also make a snip where you pivoted in the previous steps. If you don't, it won't lie flat when turned right-side out. |
 |
Now you'll turn the pouches right-side out. Reach into the gap, and pull the pouches out through it. It'll look pretty weird at first, but bear with me.
In this photo, the pouch parts have been pulled right-sides out, but the flap
is still inside-out. |
 |
| Here the flap is turned right-side. Pretty bizarre, no? |
 |
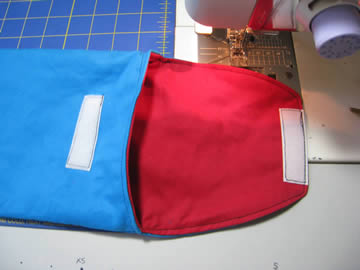
Take the lining fabric and turn it back inside-out, pushing it into the the
fashion fabric pouch. Now it's lined, but looks pretty messy. Work out the lumps
with one hand in the pouch, until everything lies flat and seems to line up inside.
If you like to iron, this is a nice place to iron the whole thing, before
you topstitch. I loathe ironing, so I just use my topstitching to keep it looking
neat. |
 |
| Pattern and directions are copyright to Jan Andrea,
sleeping baby productions, and are not for resale or sale of items made from the pattern. |
| Topstitch around the flap. I like to start where the flap begins. |
 |
| Further-away view of topstitching. I like to topstitch about 1/4" from the
edge. Many sewing machines come with a special foot that has a 1/4" guide, so
you can keep it tidy. |
 |
| Topstitch all the way around the flap, and also over the gap you made for
turning, and then you're done! |
 |
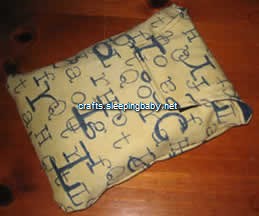
| Voila! Your own fabric diaper case... and for a heck of a lot less than $15
(plus shipping and handling), even if you factor in your time. Make a bunch to
give away, or one to match each of your baby carriers! |
 |
Pattern and directions are copyright to Jan Andrea, sleeping baby productions,
and are not for resale or sale of items made from the pattern.
other ideas:
- Add a long strap to make a dipes & wipes only bag you can wear over your
shoulder (strap would be sandwiched between the fashion fabric layers at both
sides).
- Add a little wrist
strap to make it more portable, or a strap with a couple of sets of snaps to
allow it to hook onto a belt, carrier, diaper bag, etc.
- Put a belt loop on the
back for the diaper-changing man in your life (just use fabric he'll like; it'll
never look like a diaper bag, and is far more portable than a "real" diaper bag).
- Put a pocket on the front or back for ointment or other little diaper-changing
necessities.
- If you have multiple children in diapers, make these in different colors
to keep the sizes separate.
Here are pictures of my little prototype ( the one made from this pattern is
about 1/2" narrower, because the width of the one in the picture was a bit much):

Reader suggestions:
Megan M. used the directions to make a snack pouch: "Just
wanted to drop you a line a say a quick thanks for your diaper pouch pattern.
I have made many for baby shower gifts for friends and was thinking about other
uses. I changed the dimensions, but used the same pattern (made about half as
tall) and used PUL for the liner and I have my own reuseable snack bags! Just
another great use from your pattern."
other ideas on the web:
Open
pouch by Shelley -- this makes a pouch that's sized just right for diapers
and a wipes case, but it's stiff and open at the top, perfect for organizing
in your diaper bag.
Here's a clever design made
from a placemat.
This one is landcape
rather than portrait format :)
This one has more pieces, but incorporates
a built-in changing mat and a little handle.
Want a no-sew
clutch? Use leather!
Pattern and directions are copyright to Jan Andrea, sleeping
baby productions, and are not for resale or sale of items made from the pattern.
All content, barring that which is otherwise attributed, is ©2023 to
Jan Andrea. If you wish to use my content on another page, please email before
doing so, even for content with the Creative Commons licenses. Text/images used
elsewhere must be attributed to me. Be advised that I will pursue copyright
violations.