 A Simple, Un-Padded Pouch Sling (Revised
7/27/2005)
  A Simple, Un-Padded Pouch Sling (Revised
7/27/2005)
 En Español (pdf, 747 kb) (gracias a Monica Salazar!)
I have other directions with line drawings ra ther than photo illustrations, but was asked to provide photo illustrations for people who had not previously seen or used a pouch-style sling. You may want to compare the two styles and see which "clicks" best for you.
Also, please note that although this page is illustrated with pictures of my son, the pattern is for an adult-sized sling. I didn't want to make a full-sized sling just for the directions, so I made one to fit Stephen instead.
Interesting note: the curved-seam pouch was invented by Hygeia Halfmoon, who then showed the method to Nancy Main, who started "New Native". Now many pouches for sale are labeled "Native-style" even though they are a very recent innovation (certainly not actually Native American), dating back to the 1970s with Hygenia's book "Primal Mothering in a Modern World". My thanks to Jenrose for this tidbit.
PLEASE click and read the link (http://www.thebabywearer.com/articles/HowTo/Positioning.pdf) -- it has VERY important information about correctly wearing a pouch or ring sling!
This pattern is copyright to me (Jan Andrea) and is NOT for resale under ANY circumstances!
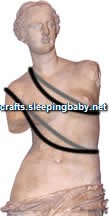 Before you begin, you'll need to know how long to make the sling. Most pouch-style
slings are shaped so that the upper, open portion is shorter than the lower,
folded portion. This makes measuring for one a little tricky, since the place
you measure will impact the final size of the pouch, and therefore, how well
it fits. The black lines in the picture at right approximate the curve the pouch
will take when worn with a baby in a cradle hold. ( the grey lines show how the
fabric will likely spread across your back.) If you are currently pregnant, not
to worry! You'll be measuring mostly above the bump anyway, but if your tummy
gets in the way, just subtract a couple/few inches from the bottom/longer measurement.
 I used to recommend using two measurements (along the upper and then the lower
lines in the picture at right), but that seems to have caused more confusion
than anything else, so I'll go with what most people end up doing anyway. Measure
yourself from your shoulder to the opposite hip ( the point of your shoulder,
and the place on your hip where you rest your hand if you place your hand on
your hip -- this number will probably be somewhere between 20 and 30") and
double that measurement. Or, measure all the way around, from shoulder to opposite
hip and back up to that shoulder. Your final measurement will likely fall between
40" and 60", depending on your size.
If all else fails, try experimenting by folding the fabric as shown in the instructions below and pinning it in different places, until it feels right. Again, err on the larger side.
| Worksheet | Upper (shorter) |
Lower (longer) |
| Base measurement: | ||
| + seam allowance (2"): | ||
| + baby allowance (2-4"): | ||
| Final measurement (TLF): | ||
| 1/2 TLF (for cutting): |
Seam and Baby Allowances:
Obviously, you'll need to add a little length for the baby. I would start pretty conservatively, adding 2-4" to each measurement; you can always take the pouch in if it's too big, but it's more difficult to add more material once it's done. Then, you'll need to take a seam allowance into account. I use an enclosed seam on this project, because the double seam makes it extra sturdy. Allow about an inch on either side for the seam allowance -- so add another 2" to your measurements. You'll have the longer of the two measurements + 2-4" baby allowance + 2" seam allowance. This is the total length of fabric you'll need -- henceforth referred to as TLF. ( the 6" addition is to the your *doubled* measurement, if you've measured from your shoulder to your hip. So your final number should be somewhere between 46-66".)
Polar fleece caveats:
 |
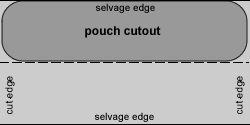 |
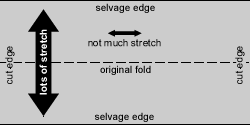
| Cutting stretchy fabrics -- always cut with the majority of stretch going across its width, not along the length of the carrier. |
Polar fleece usually has some stretch going from cut edge to cut edge, and a lot of stretch going from selvage to selvage. Make sure you know which direction is the stretchier one! My first polar fleece pouch was a disaster because I had the stretchier direction going along the sling instead of across it. It was always too tight when I had it on without Stephen in it, and then stretched too much when I put him in. Also, you will probably find that you can cut it to your actual around- the-chest measurement, instead of adding a few inches, since it will stretch when you put the baby in. This goes for any stretchy fabric.
When sewing with polar fleece (or other stretch fabrics), be sure to use a stretch stitch. A simple zigzag is fine, or you can use one of the fancier stretch stitches if your machine has them.
Pouch seam with fleece: in lieu of sewing a full French/flat felled seam as below, you can just sew a sturdy seam (a couple of rows of zigzags, or another stretch stitch), trim one side of the seam allowance to 1/4" less than the other, and sew the wider seam allowance over the narrower one, again using a stretch stitch. It's not quite as strong as the French/flat felled seam, but it's plenty strong enough.
I think the simplest way to do this is as follows: when cutting the top rail of your pouch, just make an angled cut in the fabric ra ther than one straight across as shown. That will give the pouch some shape. I think if you tried to do that with the fabric un-folded, it would be tricky to make it symmetrical, though. (Note that this should be the *upper, shorter* edge that is slanted, not the *lower, folded* edge.).
Wider is NOT better when it comes to pouches! the safest pouch is one that will adequately enclose your baby, but which is not so deep that you have to pull the fabric apart to see her inside it. A deeper pouch (more than 22-24" from edge to edge) puts a baby at greater risk of positional asphyxia, since it's harder for the wearer to see her position, plus the additional depth can hamper proper positioning in the pouch. [PLEASE click and read the link (http://www.thebabywearer.com/articles/HowTo/Positioning.pdf) -- it has VERY important information about correctly wearing a pouch or ring sling!] the vast majority of ready-to-wear pouches are between 20-24" wide, and there is a good reason for that! You do not need to make a sling wider than that, and I would strongly caution against it if you are considering it!
Cut the fabric so you have two pieces that are 1.5-2 yards long and 22" wide. there will also be a long strip about 12" wide left over; you can use it to make accessories, or make a child-sized sling to match yours -- pouch or ring type :)
You can either cut or fold it in half, so it's 22" wide. This works especially well with calico prints; you can sew the edges together and then "quilt" the layers for more strength. If your fabric is heavy enough without doubling, you can cut it down the center fold and have two 22" wide slings. (Please feel free to email me if this isn't clear enough!)
A pouch-style sling should be between 20-22" wide before it's folded for wearing (see below, or Hotslings.com for great wearing directions) and 10-11" deep when folded.
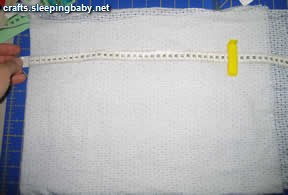
First, fold your fabric in half on its width (matching cut edges) and then on its length (matching a selvage edge and the cut edge). Basically, you want the fabric folded so the longer dimension is in half, then the narrower one. then, mark half of your measurement on the lengthwise fold (this assumes you have not already cut the fabric to length): (for example, if your TLF is 56", this measurement will be 28" -- use the worksheet above if you desire) |
 |
Mark the measurement minus about 3" on the upper edge: (If you are making a tapered pouch, cut this measurement at a slant, downwards towards the folded edge. In this picture, that would be towards the lower left corner. In order to make this the same length as what you measured, you'll need to move the point you measure to -- in this case, the yellow marker would need to be moved slightly down and to the left.) |
 |
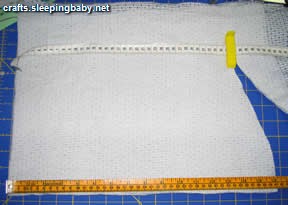
To make the pouch sling truly pouch-like, you'll need to cut a curve into the unfinished edges: Note that the curve straightens out as it approaches the unfinished edge. This will make hemming the edges a lot easier; I would recommend having a straight section about 1.5" long to accommodate a 3/4" rolled hem. For polar fleece, you can make the curve less pronounced. |
 |
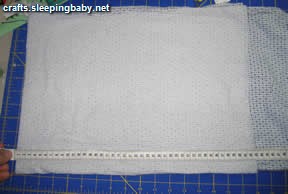
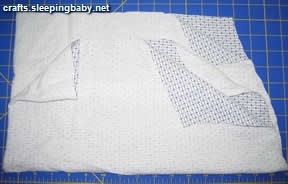
Here is a picture showing all the different layers. You can see my widthwise fold at the left, and the lengthwise fold along the bottom. There should be four layers all together. |
 |
| Here the pouch-to-be is shown with the lengthwise fold unfolded. The widthwise fold is still at the left, and the curve is at the right. You will be sewing along the curve in the next step. | 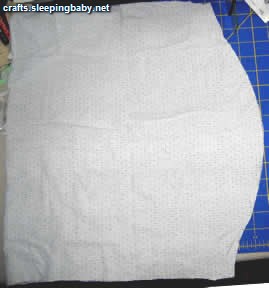 |
To make a combination French and flat-felled seam ( the most sturdy and the one I recommend for pouches), fold your fabric so the wrong sides are together. Stitch about 1/4" from the cut edges along the curve. I use my presser foot as a guide. Now is a good time to try on the pouch to see if you've gotten a good fit. the pouch should be just loose enough that you can fit the baby inside (or, if you're still expecting, it should have about 4-6" of give to it). If it's too big, you can take it in, but don't take it in too much -- you can always make another straight seam at the shoulder if it's still too large, but you can't make it larger again! |
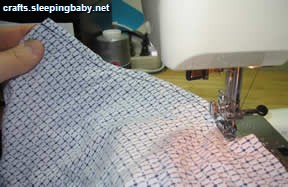 |
Next, turn the pouch-to-be inside out, so the right sides are together. You can press the previous seam, but I usually just finger-press as I go, rolling the seam so that the stitching is as close to the edge as it can be. Sew again, but between 3/8" and 1/2" from the edge, so that the cut edge in the previous seam is completely enclosed in the new stitching. When you've finished that, you've got a French seam, which is sturdy enough in itself, but I find the resulting band of fabric irritating. |
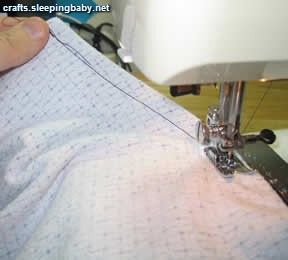 |
| The completed French seam, close up: | 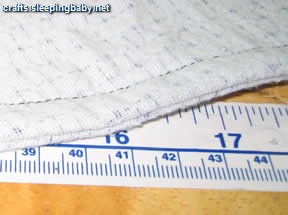 |
To make the flat-felled seam, fold the French seam over to one side, then stitch it down, close to the edge of that seam: This is a little tricky with a curved pouch seam, so go slowly. I usually pull the underlying fabric apart as I sew, making sure that the stitching line remains in the center. (This is less complicated than it sounds -- just make sure you're sewing through only the French seam and the fabric that is directly below it, without having a fold of fabric to the left of the needle underneath.) Here's an excellent photo tutorial on making a flat-felled seam at Instructables. |
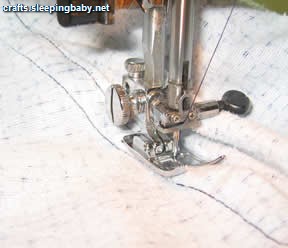 |
the completed flat-felled/French seam from the right side: Notice that the flat-felling stitch is a consistent distance from the original French seam stitch, with no folds in the fabric. |
 |
Now that your curved seam is done, it's time to hem the edges. (You *can* hem the edges and then sew the curved seam, but it's not as neat and professional-looking that way. I've seen a WAHM sling that had the edges hemmed first, and it looked awful -- I can't imagine selling such a thing.) I generally just fold the edge under 1/2", then another 1/2" after that, making a simple rolled hem. |
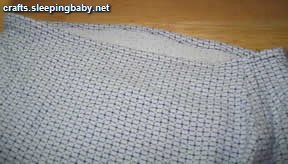 |
A closeup of me sewing the hem: My usual method is to make the initial fold, put the needle into the fabric, roll some more about 8" away from the needle -- so there's a continuous fold between the needle and my hand -- and sew that section. Stop, roll, and repeat as necessary. You can use an iron and press the hem in, but then you have to iron. Yuck. Unless your fabric is extremely difficult to work with, I would recommend just folding and stitching. Ironing sucks. |
 |
Here's the pouch, unfolded, with all the seams and hemming done: When you wear the pouch, it will actually be folded in half -- as shown in this photo, the fold will be along the center horizontal line. |
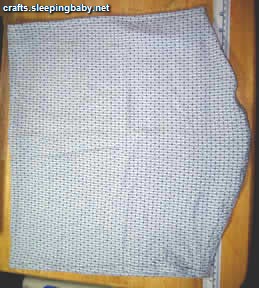 |
Here's the pouch folded in half: |
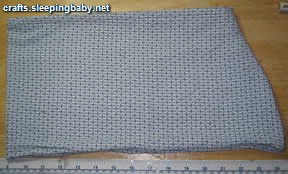 |
When you use the sling, the folded edge will be at or near your shoulder, and the baby's bottom should rest in the curved edge, the pouch part, which will be between your hip and your chest (depending on where you want the baby and how old s/he is). Try the sling on with your baby in it before you put away the sewing machine. The baby should sit comfortably against your upper torso. If s/he hangs too low -- at or below waist level -- you may find that your back starts to hurt. If the sling is too long, you can take it in along the shoulder -- the width-wise fold. Unfold the lengthwise fold, so you have the D-shape above, then sew a seam along the widthwise fold. This is something you can take out later as the baby grows. |
 |
Here's Stephen wearing this pouch with Nemo as his baby. Nemo is beween the layers, so he's completely surrounded by fabric. If Nemo were a real baby, Stephen would wear him with Nemo's head toward his shoulders, and Nemo's legs towards his waist. Nemo's bottom would be just at the curved seam. And if Nemo were a toddler, he'd be sitting with his bum at the curved seam, with his legs over the inside hem and the outside hem up at his shoulders. |
 |
| Reversible pouch sling directions are on the other page. |
Farha sent this idea: My sling is made from a double layer of cotton interlock with 3% lycra for just a bit of stretch. I wanted to share a modification I made. I added leg holes to make the sling more comfortable for both mom and baby as baby gets bigger. My daughter rides facing me with her legs though the holes cut into the inner section so she can straddle my hip. I get compliments on the sling every time I wear it and most people are surprised to hear I made it myself.
I get a fair number of emails from women who want to sell pouches locally and want my permission to use the directions here. I've got no problem with people using these directions to make and sell pouches, but there's way more to it than that. Please read the three essays I've linked to on the index page -- they should clear up some of those points. With pouches, there is an added caveat. The trickiest part of making a pouch is the sizing, and the sizing is really key for a safe and comfortable pouch. Too big, and the wearer's back will hurt (since the baby will lie too far from her center of gravity), and there's a risk that the baby can "flip out" of the pouch (or, alternatively, be too curled up and risk oxygen deprivation). Too small, and it's impossible to wear. The New Native pouches end up being too big (based on t-shirt sizing) for most women, who then give up on slings unless they happen upon the right size by chance. If you look at Hotslings and other WAHM pouch makers' sites, you'll see that they tend to have fairly complicated sizing calculators, all of which are proprietary, but this sort of system is really necessary to get a well-fitted pouch. If you can manage to make testers for a lot of different-sized women, that's one step towards success, but it takes a lot of work. That's one of the reasons I don't sell pouches, even though they take less time to sew. I just don't have the energy to make up a sizing table. It's hard enough with a ring sling, which is still adjustable!
So, sure, make pouches for people you can fit in person and be sure that the size is just right; but if you try to make just a few sizes and sell them to all women, problems will result. either you'll face a constant stream of returns for too big or too small slings, or your customers will attempt to wear the wrong-sized sling, and that is a hazard for them and, by extension, for you. I've seen several women in Dover alone who bought pouches from a local vendor. Her sizing seems to be all off, unfortunately, since the majority of women had to keep one arm around their babies in the sling -- they were sitting at hip level and leaning way back, both of which are signs of a far-too-large pouch. I've advised them to return the pouches, but there's not much else that can be done until the vendor realizes that she's selling an unsafe product. Don't let that happen to you!