Variations on ring-sling shoulders
Arranged in ease of sewing/preparation (IMHO)
Please note: These styles have been used for many years by various sewers,
and I'm not claiming credit for coming up with any of them (except the overlapping
pleats, which can, of course, be independently derived by others as well).
Remember to wash and dry your fabric before cutting! Most natural fibers will shrink when they're washed and dried, so you must pre-treat your fabric the way you'll be treating it after it's done. If you only plan to hand-wash your sling after it's sewn, you should hand-wash the fabric before cutting; if you'll be machine washing and drying, machine-wash and dry before you cut. And it's best to err on the side of too long than too short; you can always shorten a sling, but it's much harder to add a panel to the end to make it longer.
Gathered:
Gathered shoulders are the easiest to sew, and if you have a simple sewing machine, tend to be the easiest on your machine as well. There is a small amount of prep work involved -- namely, cutting a nice straight edge to start with and then marking the line along which the rings will be sewn in -- but if you take your time on those, the actual sewing goes pretty quickly.
This shoulder style works well with virtually any fabric, and if you sew far enough back from the rings, you get a sort of padded effect because the fabric can be doubled all the way over your shoulder. However, this does take a lot of fabric, so if you're using an expensive wrap, it may be better to sew closer to the rings. You'll need to subtract the amount that's brought through the rings from the final sling measurement; in this video, I've sewn 8" from the rings, so if I wanted an 80" sling, I would need to cut my fabric 8.5" longer, for a cut length of 88.5" (although that much precision is not really necessary -- 88 or 89" is fine -- the half inch is for the material I've folded under along the seam, to make the back look tidy). If you've serged the cut edge, you can just sew on top of that without folding under, but then it won't be reversible.
Pouch fold:
Folding the fabric in half along the length yields a pouch fold. (No picture
of this because it seems pretty unnecessary!) the folded fabric is pulled through
the rings and sewn as above. The Baby
Space Adjustable Pouch uses this -- the fabric is folded in half, and a pouch
seam is sewn in at a specified place along the sling, making a pouch with rings.
I don't know if I'd use this without the pouch seam, as it seems to me it would
be difficult to open the fabric out to spread across your back. For a similar,
though narrower, width that will open out somewhat better, I'd recommend the
letter fold (below).
Letter fold:
 This probably
has an actual name, but I don't know what it is. Basically, the fabric is folded
in thirds as one might fold a business letter. It will make for a wide shoulder,
but not as wide as the fanned or pouch folds. It will cup the shoulder when put
through the rings, because it will naturally gather a bit more within the rings.
Because of the way it's folded, it may be somewhat difficult to spread out over
your back.
This probably
has an actual name, but I don't know what it is. Basically, the fabric is folded
in thirds as one might fold a business letter. It will make for a wide shoulder,
but not as wide as the fanned or pouch folds. It will cup the shoulder when put
through the rings, because it will naturally gather a bit more within the rings.
Because of the way it's folded, it may be somewhat difficult to spread out over
your back.
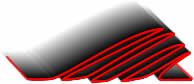
Accordion fold:
 The
Mayawrap site has directions for
making a sling like their old design. (If you have looked for ring slings to
purchase lately, you'll note that they no longer sell this design of sling on
their site. Accordion-pleated slings put stress points on the material where
the rings are sewn in, which, over time, can cause a small stress-induced tear at that point,
and they are also difficult for many women to get comfortable. The new MayaWrap
lightly padded design is much more comfortable, but as it is also a significant
innovation in design, they understandably have not published sewing directions
for it, and I think it's important to respect that.) The image at right shows
some of the folds ( there may be more) with the "shoulder
cap" spread out. This style works better on one shoulder than the other;
the MayaWrap is designed with the right shoulder in mind. Many of the slings
sold as "like Maya" or "Maya-style" on eBay are folded this
way (although some omit the shoulder cap, which can make wearing less comfortable,
as the sling will tend to migrate towards the wearer's neck). MayaWrap does
request that their directions are for home use only -- please keep this in mind
if you want to sell slings.
The
Mayawrap site has directions for
making a sling like their old design. (If you have looked for ring slings to
purchase lately, you'll note that they no longer sell this design of sling on
their site. Accordion-pleated slings put stress points on the material where
the rings are sewn in, which, over time, can cause a small stress-induced tear at that point,
and they are also difficult for many women to get comfortable. The new MayaWrap
lightly padded design is much more comfortable, but as it is also a significant
innovation in design, they understandably have not published sewing directions
for it, and I think it's important to respect that.) The image at right shows
some of the folds ( there may be more) with the "shoulder
cap" spread out. This style works better on one shoulder than the other;
the MayaWrap is designed with the right shoulder in mind. Many of the slings
sold as "like Maya" or "Maya-style" on eBay are folded this
way (although some omit the shoulder cap, which can make wearing less comfortable,
as the sling will tend to migrate towards the wearer's neck). MayaWrap does
request that their directions are for home use only -- please keep this in mind
if you want to sell slings.
I've recently redone the instructional page for MayaWrap! Readers of my page will recognize the style :)
Hotdog:
 The term "hotdog" comes
from the observation that the fabric, when folded in towards the center several
times, makes a sort of hotdog-bun shape. The sling's edges end up inside the
folds, rather than along the outside of the sling, which can make it difficult
to keep in place if you have broad shoulders, but is fine if you have pointed
or narrow shoulders. The width of the finished shoulder using this method will
depend on the number of times the fabric is folded, and the original width
of the first fold. Cel has
a great photo
tutorial, including great shots of sewing the rings in.
The term "hotdog" comes
from the observation that the fabric, when folded in towards the center several
times, makes a sort of hotdog-bun shape. The sling's edges end up inside the
folds, rather than along the outside of the sling, which can make it difficult
to keep in place if you have broad shoulders, but is fine if you have pointed
or narrow shoulders. The width of the finished shoulder using this method will
depend on the number of times the fabric is folded, and the original width
of the first fold. Cel has
a great photo
tutorial, including great shots of sewing the rings in.
"Centerfold" -- simple
 (For
those of you who have been sewing for a while, this is the same thing as a box
pleat.) This simple centerfold (name coined by Tessa of mamasupial.com)
will be somewhat wide, but should spread out nicely, and because of its symmetry,
will cup the shoulder nicely. The rings should be sewn in so that the pleated
parts are underneath. I like this a lot for kids' slings.
(For
those of you who have been sewing for a while, this is the same thing as a box
pleat.) This simple centerfold (name coined by Tessa of mamasupial.com)
will be somewhat wide, but should spread out nicely, and because of its symmetry,
will cup the shoulder nicely. The rings should be sewn in so that the pleated
parts are underneath. I like this a lot for kids' slings.
"Floating" Rings (used in combination with centerfold or gathered):
Corrine and Tessa use
this method in their slings, and were kind enough to share it here. With "floating"
rings, the seam to sew the rings in lies between 9-12" from the rings, instead
of 2-4". This means that the shoulder stays at the folded width all the
way over the shoulder (making this a good method to use with slightly wider folds,
like the centerfold, letter fold, or gathered shoulders), and can allow the fabric
to cup the shoulder more securely. It also allows the rings to be worn very
high on the shoulder while still capping it comfortably -- high rings are less
likely to get in the way of baby's head. Corrine recommends 9" for petite
wearers, and 12" for larger wearers, and of course you can play with the
distance to determine the best one for you. Photo-illustrated
sewing directions are here.
More complex "centerfold": AKA symmetrical pleats
 This
centerfold has been folded in an accordion once more on each side. This makes
the shoulder somewhat narrower, while still allowing it to cup the wearer's shoulder
nicely. I would suggest marking the fabric in 10 equal segments (on a 30" wide
sling, each segment would therefore be 3" wide) before folding, to insure
symmetry and evenness. Or, you can make the folds themselves uneven, or overlap
them. Many variations are possible with this style: you can do a symmetrical
version of overlapping pleats, or a symmetrical version of the MayaWrap accordion
fold, or any number of possibilities in between. The finished width will depend
on the number of pleats and their positioning. The rings should be sewn in so
that the pleated parts are underneath. Caveat: the point where the pleats meet underneath can be prone to tearing where the rings are sewn in, so care should be taken to reinforce that area.
This
centerfold has been folded in an accordion once more on each side. This makes
the shoulder somewhat narrower, while still allowing it to cup the wearer's shoulder
nicely. I would suggest marking the fabric in 10 equal segments (on a 30" wide
sling, each segment would therefore be 3" wide) before folding, to insure
symmetry and evenness. Or, you can make the folds themselves uneven, or overlap
them. Many variations are possible with this style: you can do a symmetrical
version of overlapping pleats, or a symmetrical version of the MayaWrap accordion
fold, or any number of possibilities in between. The finished width will depend
on the number of pleats and their positioning. The rings should be sewn in so
that the pleated parts are underneath. Caveat: the point where the pleats meet underneath can be prone to tearing where the rings are sewn in, so care should be taken to reinforce that area.
Eesti shoulder:
This pleated/gathered hybrid was developed by Karen Hoppis; Eesti means "little Estonian" and is meant to honor Karen's Estonian heritage. It's a slimmed-down version of a fully-gathered shoulder, with small pleats on either side, which can make it more comfortable to wear if you find a gathered shoulder overwheming but need a greater material spread than a fully-pleated shoulder. Please do not use these directions to make slings to sell. The design is licensed to Sleeping Baby Productions for sale, and Karen has not licensed it to others -- it is up to her to do so if she chooses.
Overlapping pleats:
 This
is my favorite method, but mostly because I've done so many of them and find
it comfortable to wear on either shoulder. My directions have
much more information about sewing this style.
This
is my favorite method, but mostly because I've done so many of them and find
it comfortable to wear on either shoulder. My directions have
much more information about sewing this style.
Here's a video showing pleats on a nylon mesh sling, for water use.
Asymmetrical overlapping pleats:
 This
is what you get if you combine the accordion fold with overlapping pleats, I
think. It could be difficult to fold, but since it's asymmetrical, who would
notice? This style tends to favor one shoulder (left or right) over the other,
since it is asymmetrical.
This
is what you get if you combine the accordion fold with overlapping pleats, I
think. It could be difficult to fold, but since it's asymmetrical, who would
notice? This style tends to favor one shoulder (left or right) over the other,
since it is asymmetrical.
Box pleat variations:
 There
are tons of ways to use pleats when making a sling. I make box pleats when I
do a sling with sewn-in pleats. I think sewing them in would be the best method
for this sort of fold, as they would be difficult to maintain with pins alone.
Variations on this style could involve any number of pleats in any arrangement,
but the symmetry is a strong point, as it makes the sling usable on either
shoulder and with little adjustment necessary.
There
are tons of ways to use pleats when making a sling. I make box pleats when I
do a sling with sewn-in pleats. I think sewing them in would be the best method
for this sort of fold, as they would be difficult to maintain with pins alone.
Variations on this style could involve any number of pleats in any arrangement,
but the symmetry is a strong point, as it makes the sling usable on either
shoulder and with little adjustment necessary.
Know another method you don't see here that you'd like to share?
Please write
to me with a picture or description, and I'll put it up here
with a credit to you!
All content, barring that which is otherwise attributed, is ©2023 to
Jan Andrea. If you wish to use my content on another page, please email before
doing so, even for content with the Creative Commons licenses. Text/images used
elsewhere must be attributed to me. Be advised that I will pursue copyright
violations.