I
don't know why I didn't think of this sooner, though I'm sure someone else out
there must have. It's so simple and obvious that I can't have been the first!
[However, Google never found instructions for it before I put mine up, for what
that's worth.] This came about (for me) because I had ordered some Indian "tapestries" --
those gorgeous tablecloth-sized printed hangings you often see on college students'
walls. I was thinking about making them into slings, which would probably require
cutting them in half lengthwise, since the ones I ordered were 70" by
106",
and most ring slings are between 25-30" wide. Anyway, I got them in the
mail and immediately wanted to use one as a sling. I have a lot of sling rings
around, because I make slings, and I thought, well, threading the tail through
the rings is secure... why not try it with the shoulder, too? So I did, and it
was great.
Since I put this up in 2004, a lot of ladies have started using this method
with short wraps (pieces of fabric meant for baby slings that are between 90-130"
long) -- particularly what are known as "GSWs": German-style wraps.
That includes Didymos, Girasol, BB-Slen, Bara Barn, and a whole host of others.
It also works splendidly with other carries, like rebozos and selendangs. You
may be here from a link on mothering.com concerning H.U.G.S. (Help
Us Give Slings), an organization that donates slings to displaced persons in
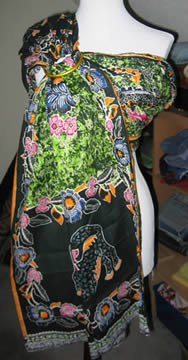
places like Indonesia. If you haven't come here from there, go there and buy
a selendang! they are incredibly beautiful, tremendously inexpensive, and will
make a great no-sew sling! (One is shown at right.)
Of course, the easiest way to make a no-sew sling is to buy 4-5 yards of
a lightweight material (like gauze, for summer wearing), thread the rings on
so they're both hanging from the middle of the length, and then treat the whole
thing like a single layer (so that the whole sling is two layers, with the
fabric looped around the rings at the shoulder). Be sure to check the fabric
that loops around the rings on a fairly frequent basis, if it's a lightweight
fabric that might be prone to tearing. And it can get a little confusing having
two tails to tighten and loosen, but for a quick and dirty sling, you can't beat
that! DO NOT use gauze for a single layer sling!
Update: Didymos now has a version of these directions in German, and
with clearer pictures. (Well, what can I say -- they have a photography budget,
and I don't :D) They appear to have added them on September 19th, 2007. So
if you're a native German speaker, or just want to check out the pictures, click
on over to http://www.didymos.de/html/ringtrick.htm Just
remember, you saw it here first -- LOL!
Another update: Here's a terrific
Video on YouTube uploaded in July,
2007, showing how to make a no-sew sling. My only addendum would be to make sure
the fabric is spread out really well within the rings before using it, but
the video may be very helpful if you find my directions difficult to understand
:) Here's
a clever set of variations, including one that keeps the rings from
digging into your shoulder if you're on the petite side.
Yet another update: If you have bought a kit for a no-sew sling, please
be sure you fully understand the threading directions. Some of those available
from commercial sites include no pictures and shoddy text instructions at best.
Let me be clear: a no-sew sling that is not properly
threaded is at risk of harming your child. If your kit did not include
adequate directions, please be sure to write to the seller and let him know!
Lookit! I made a video, too! My husband says I made too many side comments,
so please let me know if it was confusing and I'll try again. I figured that
the video, plus the written instructions, would be pretty clear if they're used
together.
Materials:
One piece of fabric of an appropriate size (between 25-35" wide and
at least 80-90" long -- shorter if you are petite, longer if you are zaftig)
One pair of rings
I used aluminum rings from SlingRings.com.
The turquoise ones matched the blue tones in the tapestry I picked perfectly.
The thinner the fabric, the smaller your rings can be. I would use medium
rings for a HUGS selendang, but large rings for a GSW.
Time: about 2 minutes
Method:
What you're basically doing here is threading the fabric through the rings
twice -- it's just like threading a ring sling, only you do it for the shoulder
as well as the tail.
The two threadings should be opposite each other -- when
you're threading a sewn ring sling, the tail fabric comes out on top when you're
done threading (i.e. it's in front of the rings, not behind). You need to make
sure that when threading the shoulder, the excess shoulder fabric ends up underneath
(behind the rings). If both tail and shoulder fabric end up on the same side,
it'll be more likely to slip when you're wearing it.
You might want to thread the tail part first, so that you have a tail of the
desired length, and then thread the shoulder afterwards with whatever fabric
is left over.
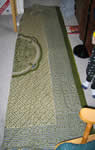
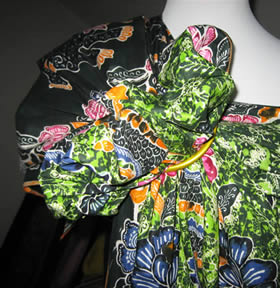
If your fabric is very wide (more than 35" wide), fold it
to an appropriate size (between 25-35" wide). The thicker the fabric you're
using, the larger the rings will need to be, so keep that in mind. Shown at right
is a tapestry I picked up on eBay. Subsequent photos will show a HUGS selendang.
At right is the selendang -- I cut the vertical stripes off
the end on the right-hand side, so that the two ends were different. That was
solely for the purposes of this tutorial, and would not need to be done in an
actual no-sew sling. If you do cut down the length (because you are petite, etc.)
be sure to finish the raw end somehow, or it will fray.
In these directions, I will be putting the rings on the stripey end, and the
tail will be the end without stripes.
1. Thread one end of the fabric (I'll refer to that as the shoulder end)
through the rings as you would the tail of a sling.
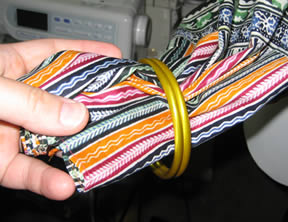
a. Hold both rings in one hand, and bring the fabric up through them both.
b. With the rings separated slightly, pull the fabric back through
the lower ring only, so that it is looped around the upper ring securely. Shown
at right is just the first part of the end being threaded back through, so that
you can see both rings.
This should hold both rings together when the fabric is pulled.
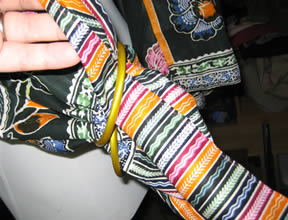
c. The full width of the fabric is shown pulled through, but it's very lumpy
in the rings right now. The next step will show you how to get the fabric nicely
spread out.
d. Pull the fabric back through the rings a little bit, so that you can spread
the fabric out and make it evenly gathered within the rings. I usually do this
by pulling the fabric back a little bit -- maybe 2-3" -- and then putting my
thumbs in the fabric loop from both sides. Then I use my fingers to spread the
fabric over my thumbs. When I take my thumbs out, I pull the fabric back through
the rings, making sure that the edges stay on the edges and don't get folded
under the rest of the fabric. This spreads the fabric out quite nicely, and will
give you a nice "gathered' shoulder. (Of course, you can also use some of the
simpler folds shown on the shoulder styles page, like envelope and simple centerfold,
when threading the shoulder of your no-sew sling.)
There's an excellent
video about doing this on www.zolowear.com --
click on "Threading and spreading fabric around rings" under "videos".
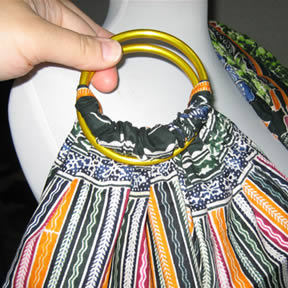
e. Fabric shown evenly spread through rings. The
striped part will be directly against your shoulder/back.
N.B. Gathering the fabric in the rings like this is an important step
that is frequently left off. However, if the fabric is left lumpy and overlapping
in the rings, it pushes the rings apart, and that makes it easier for the fabric
to slide through, a potentially dangerous situation. Please take a moment to
spread out the fabric in both threadings, for your comfort and your baby's
safety.
3. Flip the rings over, so that the short fabric end is on
the underside (that side will be against your shoulder/back). The fabric will
provide padding on your shoulder, and the friction of a tightened sling will
keep the fabric in place. I wore my 30-lb toddler in a similar sling,
and it didn't slip. (If you think you may be using the no-sew sling on an extended
basis, I'd recommend doing a few rows of hand-stitching or machine-basting where
the shoulder fabric ends, probably 12-18" from
the rings, to keep it in place and to reduce the possibility of slippage. If
you're sewing anyway, though, might as well do a more permanent shoulder...)
Shown at right is the main body of the fabric pulled back from the stripey
part, just so that you can see how it's placed. When you're wearing the sling,
the shoulder end of the fabric should not be visible.
4. Thread the other end of the fabric as the tail of the sling. Pull the
end of the fabric through both rings.
5. As with steps 1c-d, pull the fabric through the lower ring, then pull
it back out a little bit and gather it evenly around the rings.
6. The sling, fully threaded and ready to be worn!
You can pull more or less of the shoulder end fabric through the rings to
make the tail correspondingly longer or shorter. I wouldn't make the shoulder
end of the fabric any shorter than 8-10", unless your fabric is very thick, to
keep it from slipping back through the rings, but it can be as long as you need
it to be. Generally, the fabric's own friction will keep the shoulder end in
the right place underneath the body fabric.
That's it! Now you can wear your improvised sling as you normally
would... Only now, if you are on a walk and want to sit down on the grass and
have a picnic, you have an instant picnic blanket -- just unthread the whole
thing and spread it out! then when you're done, you have your sling back again.
the only important thing to remember is that when you look at the fully-threaded
sling, one end of the fabric ( the shoulder) will be under the main body, and
the other end ( the tail) will be over -- if you have a little "shoulder tail"
sticking out next to your neck, you've done it wrong.
I buy 2 1/2 yards of whatever fabric catches my fancy.
I turn it right sides
together lengthwise.
I sew the long side and one of the short sides with a straight
stitch.
I turn it right side out and hem the final short side closed.
I then
use your instructions on threading a no-sew ring sling.
It takes about 5 minutes
start to finish and is really cheap to make. Plus, since I'm not sewing the rings
on permanently, I can use just one set of rings for all the different ones I
make. And the fabric that is turned under on the shoulder is just the right amount
of padding.
Hathor the Cow Goddess posted one
with a knot instead of threading the rings
twice. I don't think it looks as comfortable -- at least, the
way she's wearing it -- but it's worth a shot if your fabric is thin enough to knot.
 I
don't know why I didn't think of this sooner, though I'm sure someone else out
there must have. It's so simple and obvious that I can't have been the first!
[However, Google never found instructions for it before I put mine up, for what
that's worth.] This came about (for me) because I had ordered some Indian "tapestries" --
those gorgeous tablecloth-sized printed hangings you often see on college students'
walls. I was thinking about making them into slings, which would probably require
cutting them in half lengthwise, since the ones I ordered were 70" by
106",
and most ring slings are between 25-30" wide. Anyway, I got them in the
mail and immediately wanted to use one as a sling. I have a lot of sling rings
around, because I make slings, and I thought, well, threading the tail through
the rings is secure... why not try it with the shoulder, too? So I did, and it
was great.
I
don't know why I didn't think of this sooner, though I'm sure someone else out
there must have. It's so simple and obvious that I can't have been the first!
[However, Google never found instructions for it before I put mine up, for what
that's worth.] This came about (for me) because I had ordered some Indian "tapestries" --
those gorgeous tablecloth-sized printed hangings you often see on college students'
walls. I was thinking about making them into slings, which would probably require
cutting them in half lengthwise, since the ones I ordered were 70" by
106",
and most ring slings are between 25-30" wide. Anyway, I got them in the
mail and immediately wanted to use one as a sling. I have a lot of sling rings
around, because I make slings, and I thought, well, threading the tail through
the rings is secure... why not try it with the shoulder, too? So I did, and it
was great.