Cutting out the fabric:
This doesn't require a specific pattern, happily. Just follow the measuring directions.
Note: these directions are best for non-stretchy (woven) fabrics. If you are using a stretch fabric, like interlock or jersey, you will probably want to cut the pieces out so they are parallel to the selvages, ra ther than perpendicular as shown below. The stretch should go across the carrier and straps, not up and down. So if you are using a stretch fabric, you'll need to buy enough to cut the length of the strap (about 60", or 1 2/3 yards).
For 45" wide fabric: this make a carrier with finished dimensions of roughly 18" wide by 20" high, with straps of 5" wide and (bottom) 22" long, (top) 45" long. (Note: this length may not be sufficient for larger wearers, or some ways of tying. Buy an extra 1/3 yard if you are concerned about strap length, and then you can piece the straps together.) Cut the strap pieces wider if you want wider straps.
For 60 " wide fabric: this make a carrier with finished dimensions of roughly 18" wide by 20" high, with straps of 5" wide and (bottom) 30" long, (top) 60" long. Cut the strap pieces wider if you want wider straps.


Please note:
- Caveats: If you have a very small frame, this layout may not work
for you. The body section is loosely based on other directions that appeared
in the Yahoo! Babywearing group. It is fairly large. Consider making a mockup
out of muslin or another cheap fabric, or just cutting a piece of newspaper to
this size and holding it up to yourself. If either of these seems too large to
you, cut the body section smaller. Some have noted that smaller carrier body
dimensions are better for infants and smaller babies, something more along the
lines of 16" by 18", and that the dimensions as shown above are better
for toddlers. I highly recommend at least cutting a piece of newspaper to size
and checking it out in the mirror; you can then make changes to the necessary
sizes before cutting your fabric!
- the number of straps you cut will depend
on your size.
- You'll want the straps to be long enough to go around you and tie comfortably. The finished carrier body is about 18" wide. If, for example, you are using 45" fabric and you have a 36" waist, you'll need another 18" of straps total, plus at least 9" on each side to tie the carrier. That's a total of 36" of strap length for the waist, so one 45" long piece cut in half (each piece 22.5" long) will suffice. If, however, you have a larger waist, you may want to cut two pieces and see how long you'll need to make each one.
- the shoulder straps are the same
way -- if you have a very small torso, a single 45" strap *may* be enough to
go across your chest and tie in the reverse, but if you have a larger torso,
you will probably want to cut three pieces, sew them all together so that you
have a 135" long piece, and cut that in half to make two 62.5" long straps. Or
cut four pieces and sew two together to make each strap 90" long. I recommend
playing with a measuring tape to see how long you'll need the straps to be. The same thing goes for the 60" fabric, of course.
- the width
of the straps is up to you as well; if you think you'll want wider straps, buy
that much more fabric. I have found that wider straps make for more comfortable
wearing. The thinner the strap, the more padding you'll want to use; whereas
a wide strap may not need padding at all. I have made an asian carrier for myself
with 8" wide straps;
 I used a little pleat to attach them to the body of the
carrier, but didn't add any padding. The carrier is quite comfortable that way.
I used a little pleat to attach them to the body of the
carrier, but didn't add any padding. The carrier is quite comfortable that way.
- You can also make the top of the carrier curved -- just curve the fabric for the body when you're cutting it out.
Sewing Directions:
- If you are using 45" fabric, your carrier body section is all set as cut out. Cut through the fold to make two separate, 22.5" by 20" pieces.
- If you are using 60" fabric, you will probably find that a 30" long carrier body is too long. I would recommend unfolding the fabric to its full 60" width and cutting off 10-15" of that length (as shown above). This will give you a 22-25" long carrier, and additional fabric to make a pocket. Refold the fabric in half, and cut in two.
- If you have fabric left over, make a patch pocket by sewing two layers together and turning right-side-out. Sew to outside carrier body piece where desired.
- If you need to sew strap pieces together to make each strap, do so now, right sides together, at the selvage ends. Make sure the pieces are sewn together very securely, as they will be holding the baby's weight. I would suggest stitching at least two seams, 1/4" from each other.
- Right sides together, sew the long edges of the strap pieces together. Finish one end of each strap. Turn right-side-out.
- For narrow shoulder straps (narrower than I have in the above layout),
you can insert polar fleece pieces for padding. Wide shoulder straps will probably
not require padding. (If you find that you prefer padding after you have sewn the carrier, you can make tubes out of fleece or another cushy material, and
slide them over the existing straps.)
- Cut the 9" wide piece in half, so that you have two pieces that are 4.5" wide by 18" long (length, of course, is also up to you).
- Fold each piece in half to 2.25" by 18". Stitch across one of the narrow ends, and up the long end, if you desire.
- Use a ruler to push the fleece into the shoulder straps, so that about 3" is left unstuffed at the unfinished end -- this end will go into the carrier, and it's easier to sew through if it's not stuffed.
- Sew through all layers down the middle of the strap (like a backpack strap).
- Topstitch all finished strap edges. For padded shoulder straps, start topstitching where the padding ends, ra ther than trying to topstitch through the padding.
- Stack and pin layers as shown in the left-hand picture below. Sew all layers together, being careful to position the straps correctly. You may want to sew the top of the carrier first, then position the straps to sew them in.
- Note: the positioning of the strap can make a big difference in the finished carrier! Straps at an angle, as shown, will allow the top of the carrier to arch out a little when the baby is in it, so s/he isn't squished. Straps sewn at closer to a 45 degree angle, as in the previous version of these directions, do not allow for as much arching, but that can be a plus if you're using stretchy material.
- Turn the carrier right side out through the hole. Topstitch around all the edges, reinforcing the straps as shown in the right-hand pictures below.
Un-curved body: sewing and topstitching
Curved body: sewing and topstitching
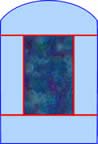 Next, decide how large you want the framed piece to be. Draw it on your newsprint
mockup.
Next, decide how large you want the framed piece to be. Draw it on your newsprint
mockup.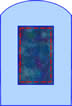 For
an appliqued body: This is even easier than the above. Cut a piece
of your fashion fabric to the desired dimensions, plus a little bit for hemming.
Hem the edges of the fashion fabric -- you'll only need to fold the fabric under
once, since the raw edges will not be seen. Then pin the hemmed piece to your
mei tai panel, and topstitch it in place. (Red dashed lines at right show the
stitching lines).
For
an appliqued body: This is even easier than the above. Cut a piece
of your fashion fabric to the desired dimensions, plus a little bit for hemming.
Hem the edges of the fashion fabric -- you'll only need to fold the fabric under
once, since the raw edges will not be seen. Then pin the hemmed piece to your
mei tai panel, and topstitch it in place. (Red dashed lines at right show the
stitching lines).